One issue Ive seen come through the doors of shops Ive worked in over the years has to do with 1 bike and multiple wheels. This is especially prominent during cyclocross season since most people cant afford 2 fully decked out bikes, but can, and do, over time accumulate different sets of wheels.
Most people think they can just switch wheels out without any problems. What they find in reality is that wheels are just as different as frames. Even if they're keeping with road wheels at a 130mm spacing, or mtb wheels at 135mm spacing. With cross I've had people just get new wheels and expect them to work. Here are some things you need to keep in mind about wheels.
- Rims are different widths. Especially the new carbon tubular wheels. They are getting very very wide.
- Hub spacing is different from the inside measuring area. In other words, yes, the drop out width is going to match 130mm in order to fit in the frame. However the flange distance, body, freehub spacing are all different for every manufacturer.
Now the easy way to "fix" this "problem" is to run the same hubs on all your wheels and to run the same rims, cassettes and chains. That way you stay with the same spacing that a single manufacturer uses.
Some companies space their freehub bodies wide, so the limit screws/adjustments are further out than if the spacing was closer to the "center point" of the hub body. This requires that you make adjustments every time you swap wheels out...supposedly.
Rims are the same way. Many aluminum rims tend to be a bit narrower than carbon rims(either tubular or clincher). However some companies, such as HED, is making their aluminum rims wider now in response, as well as the fact that it give a more sturdy surface for braking. Cantilever brakes tend to fit this wider profile a bit easier than road caliper brakes. My feeling, hope is, that in the near future road calipers will allow for easier spacing of wider rims.
Make sure you re check your brake pad/brake track heights. Some rims have a bit more variance in the high/low setting of the pads. If you have a rim that has a narrow brake track, then I try to split the difference as best as possible. Just make sure you remember which rims were narrow and which one was wide, so you don't get flustered in the middle of a wheel change with undoing and refastening the cables.
The next part is to check the shifting/high/low limit screw adjustments. Now, let me stop you here. As a mechanic, if you DO NOT know, or understand high/low limit screws and how to set them...DON'T! Ive seen it too many times in a shop where someone thought they "knew what I was doing" by setting them, and in the end me, as the mechanic, is the bad guy when I tell them they set them wrong and that's why they ripped their RD off into the frame/wheel and now new parts are in need. So, if you don't know how to dial them in, take them to your trusted LBS/mechanic(or if you're in Denver, call me, I'm a free agent), and have him/her get it set for you.
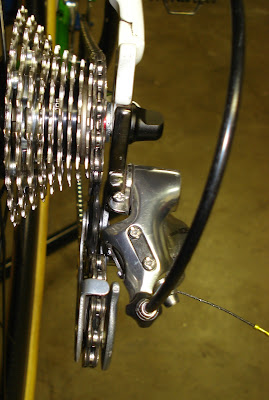
IF you do know how to set them, and play with cable tension, then my next step is to measure all the wheels in the frame, with the chain shifted to the outer most cog. This will show you distance inside the dropouts and which hubs are wider/narrower than others.
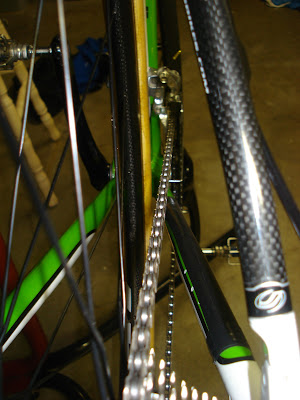
If you look at the pic above of Matt's older wheels in the frame, the spacing is wide. Now, if you look at the pic below, with his new wheel/hub in the frame, the spacing is much narrower. This can lead to a couple issues. Which hubs do I set first? Will I throw a chain either to the inside or the outside of the cassette hence damaging either the frame or the wheel?
 |
| Add caption |
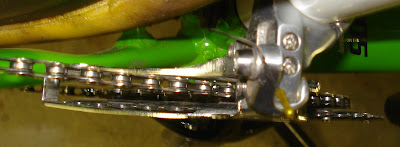
First thing to do is undo the cable fixing bolt on the RD so the cable hangs freely and you can manually move it with your hands up and down the cassette while pedaling the bike in the stand. I personally like to start with the widest of the hubs in the frame. I set the limits to that cassette first, pedaling and manually "shifting" the RD up and down with some amount of force to make sure it wont ride off the inside of the cassette or the outside. Setting the limits with a bit more room than normal on the largest cog at this point allows me to compensate(hopefully) for the narrower spaced hubs on the other wheels.
 |
| Add caption |
Once the manual adjustments have been made, and Ive checked all the wheels in the frame separately and without the RD cable fixed to the Derailleur itself, I go back to the "First" wheel, the wider one. Fix the cable in the RD bolt, and get ready to check shifting while using the shifters now, and not my hand. At this point I adjust the shifting as I would any other wheel set up, by making sure the FD/chain alignment is right and that it wont jump off while shifting from either big ring to small ring, or vice versa.
After the first wheel is adjusted, its time to adjust and check the other wheels. If you're lucky, and you made the correct adjustments with the limit screws in the previous steps, it should just be a matter of some slight cable tension adjustment to dial in the other wheels. If you run into any shifting problems, then stop what you're doing, and go to your LBS/mechanic and have them go over it. Take ALL of your wheels in you're using. It doesnt help the mechanic to guess which ones are wider and which ones are narrower.
 |
| Add caption |
In the end, its all about patience, and I realize there are other methods to achieve the same outcome. This is the method I use, and hopefully have explained in some sort of coherent manner so that you actually understood what I meant above. If anyone out there is in the Denver area, and wants to help me get some video shot for this type of stuff, I'm all ears! I just cant handle a video camera and do the adjustments at the same time, and Im not one for the Go-Pro head-cam set up. Thats doesnt do justice.
So, hope you got something out of this post, and I managed to do some good. Boots out!


Dude,
ReplyDeleteGreat write up! I'm hoping to score a 2011 Cross Check this week (in Powder Blue of course). If it happens I'd love to have you hook up the Sram setup. I've got a good camera too to shoot some HD video as well.
Josh, sorry for the late reply, blogger's not sending me notifications for comments. Definitely hit me up, and Ill get that new rig dialed in for you. Im glad you liked write up. Also, lets get together and chat about some video work!
ReplyDelete